Custom communication with a drone, let alone thousands of drones, is… as it sounds, not an easy task. Creating an efficient system for Command, Control and Communication requires many considerations. We have to ensure that drone communications happen in real-time, as this can severely affect decisions taken by the operator. This brings about two huge issues, LATENCY and Further Expansion. This article will delve into our experience, findings and proposed solutions to tackle this problem.
To start off, what are we even trying to do? What are the technologies used? Why did we make certain decisions? Are we overcomplicating things? Those are all valid questions.
So… what are we even doing?
We aim to build a Command, Control and Communication (C3) System that allows operators to command and control many, many drones. As an operator before any decision can be taken, there are many different considerations that have to be made. We aim to streamline this process.
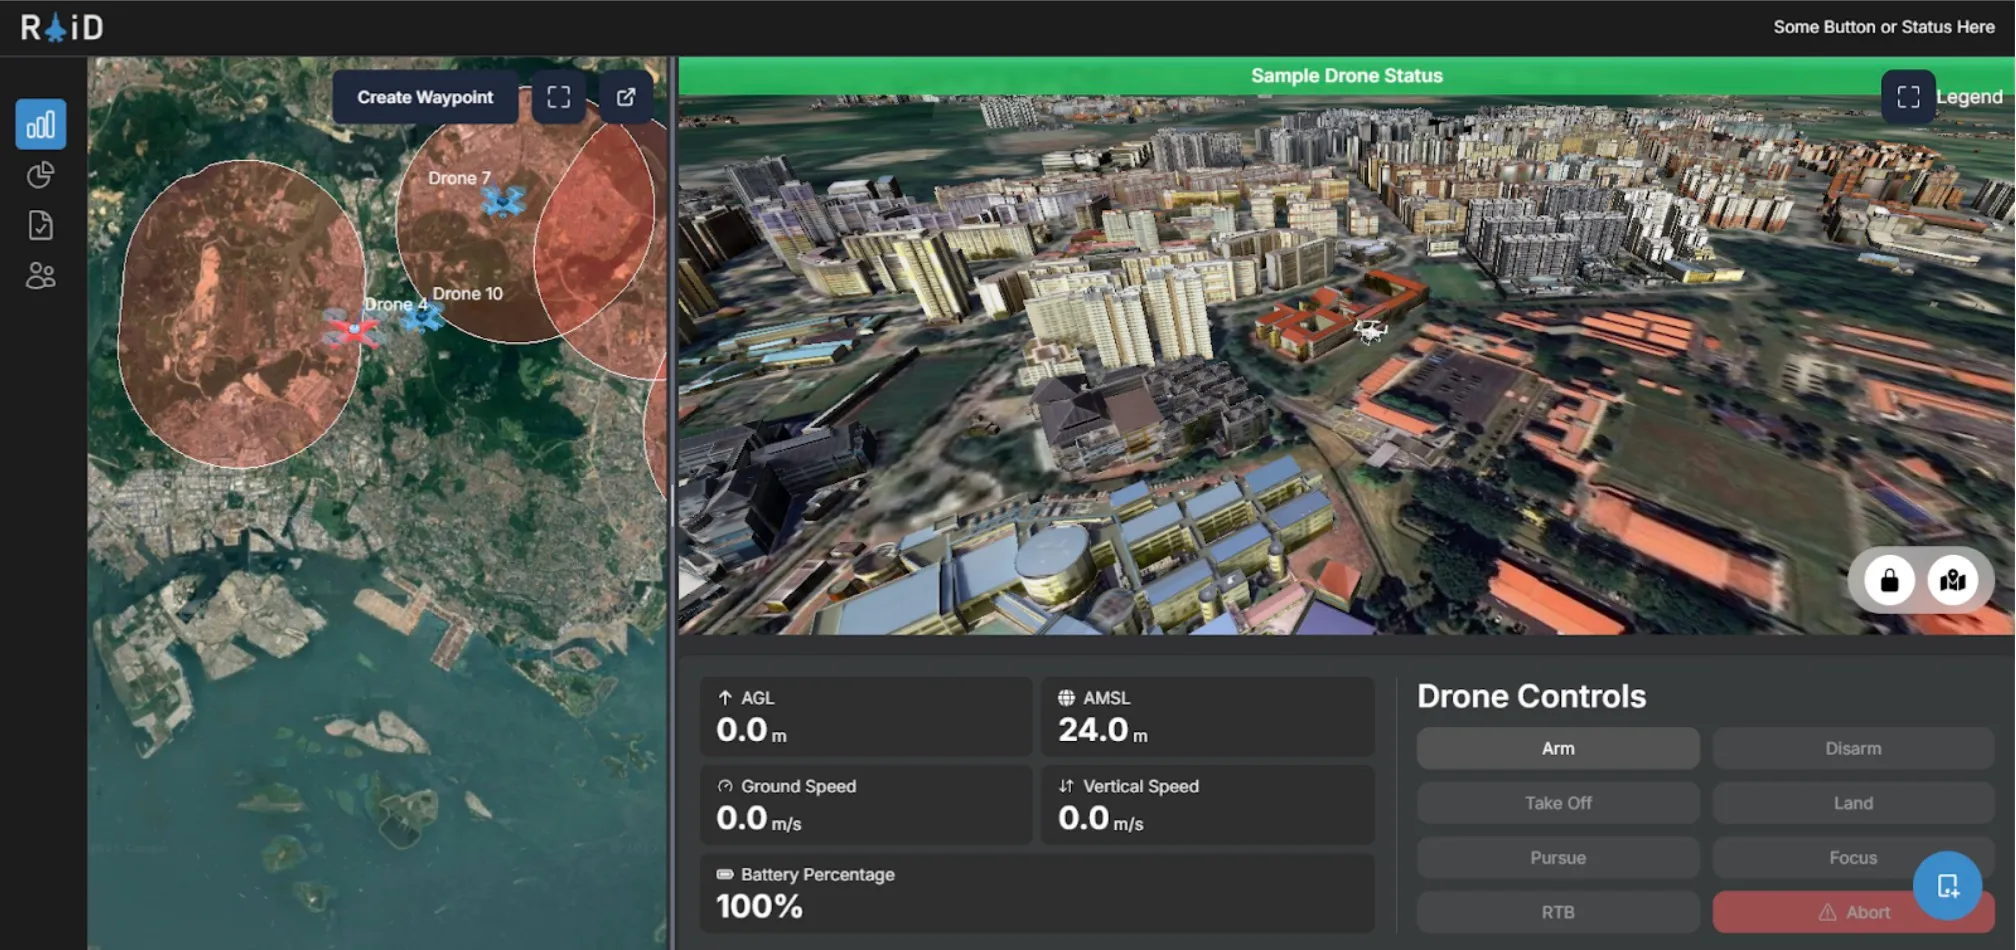
As of the time this article was written, our system allows operators to have a real-time overview of all drones, while enabling them to have fine control over each drone’s route. By selecting a drone on the left-hand panel, they are presented with a ‘control panel’ on the right-hand side, offering control over each drone’s operation.
The C3’s architecture has a Front-End for displaying information to users, while it’s Back-End handles the complex logic of data processing and communication with drones. Without going into detail into C3’s features, I’m sure you can now understand the importance of ensuring low-latency communication.
Our Drone
We use a custom-built drone, built on the PX4 Autopilot System.
By definition, an Autopilot System is the ‘brain’ of any drone. It provides basic stabilisation and pilot assistance modes (manual flight and automation of tasks, such as, take off, landing and executing predefined missions). Typically, in a pre-built drone, we would often use a Remote Controller to send commands to our drone. With our C3 system, while this is still possible, it is much more than simply just using a Remote Controller. We have to handle the actual communications between our Client and the Drone. Hence, we started off by using MavSDK.
For our initial experiments, we attempted a few modes of establishing a connection between a computer and the drone’s Flight Controller (Cube Black aka Pixhawk 2.1).1We first attempted using a standard radio receiver (RFD 900x). A transmitter radio can be connected to a laptop via a USB and communication established via serial, while the PX4 interfaces directly with the radio. However, we quickly uncovered limitations with the PX4 autopilot software, which limits the user to a limited set of flight modes, which either require a GPS module or physical joystick to be connected to the drone.
To combat this, we used a Radiomaster Zorro transmitter, which was able to interface with an ExpressLRS (ELRS) receiver on the drone. ELRS offers the unique ability to send MAVLink commands from a computer via a radio transmitter to the receiver, using a local wifi connection. Commands are sent and received via UDP ports to the MAVLink Server established locally. This meant that we were able to send MAVLink commands to the drones while maintaining connection of a joystick to the drone. We were able to successfully arm and control the drone using the C3 system’s frontend, and using a joystick at the same time. However, this method brings with it limitations as it only connects the C3 system to a singular drone, which isn’t suitable for our future work (controlling drone swarms using the C3 system). We will need to use a different mode of communication for future extensions.
MavSDK and MAVLink – Why we use it and Why we shouldn’t use it
“MAVLink is a very lightweight messaging protocol for communicating with drones (and between onboard drone components).”2
MAVLink is an open-sourced communication protocol used to facilitate the communication between a drone’s onboard system and any external systems. MAVLink is widely used in various open-sourced flight control software for drones, such as PX4 (the same autopilot system we are using!) and ArduPilot.
MAVLink uses a message-based system, where each message will contain specific data, such as position, speed, GPS or battery status readings. It allows developers to create custom messages for custom needs. It uses various channels to transmit it’s messages, namely, UART (serial communication) and UDP/TCP. However, it can be a little complicated to write MavLink code. When writing code using MavLink, we have to manually handle MAVLink’s different message types. This gives us, as developers, more control, but that also introduces more code and increased complexity.
Hence… MavSDK (MavLink Software Development Kit).
“MAVSDK is a collection of libraries for various programming languages to interface with MAVLink systems such as drones, cameras or ground systems.”3
MavSDK is a higher-level library which builds on the MAVLink protocol, making it easier for developers to interact and communicate with devices. It provides a more friendly interface for developers, with autopilot functions like arm(), takeoff() and land(). These functions are easy to use, and improves the speed of development as developers do not have to manage raw MAVLink messages manually.
MavLink
from pymavlink import mavutil

master = mavutil.mavlink_connection('udp:127.0.0.1:14540')
master.wait_heartbeat()

master.set_mode_apm('GUIDED')

# Arm the drone
master.mav.command_long_send(
    master.target_system,
    master.target_component,
    mavutil.mavlink.MAV_CMD_COMPONENT_ARM_DISARM,
    0,
    1, 0, 0, 0, 0, 0, 0
)
print("Drone armed")

# Send takeoff command to 10 meters
master.mav.command_long_send(
    master.target_system,
    master.target_component,
    mavutil.mavlink.MAV_CMD_NAV_TAKEOFF,
    0,
    0, 0, 0, 0, 0, 0, 10
)
print("Takeoff command sent")
MavSDK
import asyncio
from mavsdk import System

async def run():
    drone = System()
    await drone.connect(system_address="udp://:14540")

    async for state in drone.core.connection_state():
        if state.is_connected:
            print(f"Drone discovered!")
            break

    print("Arming...")
    await drone.action.arm()

    print("Setting takeoff altitude...")
    await drone.action.set_takeoff_altitude(10.0)

    print("Taking off...")
    await drone.action.takeoff()

asyncio.run(run())
As you can tell, code that does the same thing, writing using MavSDK is much neater compared to MavLink, allowing for improved code readability and ease of debugging.
The use of MavSDK greatly enhances the development of drone communications. However, this also introduces our initial issue: LATENCY. MavSDK is also less flexible, which will become an issue as the processes running on the drone increases in complexity.
On the contrary, as ROS 2 has deep integration into any aspect of PX4 through the use of the uXRCE-DDS Middleware, it allows us to have low-level control over our drone systems, making it ideal to integrate and manage many components and sensors. The decision to move to ROS 2 from MavSDK/MAVLink can be summarised into the following reasons:
- Low-Level Control over Systems
- Real-Time Capabilities
- Wide Ecosystem Support
The differences between ROS 2 and MavSDK have been summarised in the table below:
| MavSDK | ROS 2 Implementation | |
|---|---|---|
| Language Support | Production Ready: C++, Swift, Python, Java Proof of Concept: Go, JavaScript, C#, Rust | C++, Python through rclpy/rclcpp |
| OS Support | Required for MavSDK Server: Linux, MacOS, Windows, Android, iOS | Required for Companion Computer: Linux Exact version depends on ROS Version |
| Beginner Friendliness | Very Beginner Friendly | Advanced – Prior Knowledge Required |
As the development of more advanced on-drone technology continues to expand, its requirements will naturally grow. We are currently looking into the possibility of integrating a Camera onto the drone platform for Video Streaming and Computer Vision for Collision Detection. These technologies have to run on-device. Hence, as low-level control over the drone is required, this is where ROS 2 shines.
We will go more in-depth about the development using ROS 2 in the following sections.
Note: the following sections may use terms referring to various ROS 2 functionality. It would be beneficial to understand the basics of ROS 2 before moving on.
Drone Communication using ROS 2 with the uXRCE-DDS Middleware
Wow. that was a mouthful wasn’t it. Let me unpack what this means. Communication using ROS 2 is slightly different from how it is done with MavSDK.
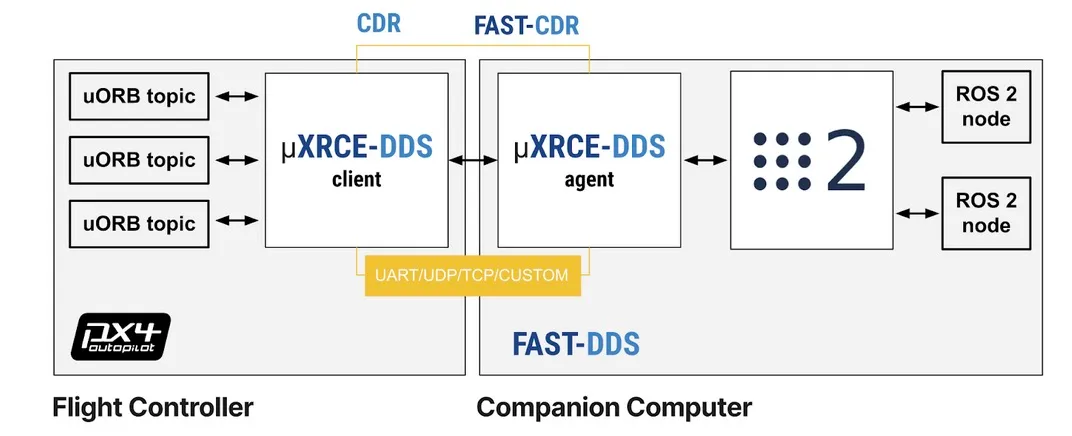
This is a diagram of how the system should be set up on the drone. On the left, we have the Flight Controller (the PX4 Autopilot Controller), and the Companion Computer (e.g. LattePanda/Raspberry Pi/Jetson Super Nano) on the right.
In a typical setup shown from the diagram, the Flight Controller will be running PX4 with the uXRCE-DDS Client, while the Companion Computer runs ROS 2 and the uXRCE-DDS Agent. The Flight Controller’s sole purpose is to manage the drone’s systems, while the Companion Controller will handle communications and any additional features.
As both the Flight Controller and Companion Computer are separate devices,we will have to connect them to each other via their Serial Ports4. In this case, the Telemetry Port on the Flight Computer will be connected to a few Serial Ports on the Companion Computer. Then, the uXRCE-DDS Middleware is used to communicate with each other over the Serial Ports.
Now that we understand how the hardware and software on the drone works, how do we set up a communication channel from our Back-End (or any scripts) with the drone? As mentioned earlier, all communications to the drone should be handled by the Companion Computer, then forwarded to the Flight Controller. This can be done using the rclpy (there is also a C++ version available!) library. Ideally, as all Companion Computers must contain the same softwares, we want to dockerise everything through the use of Docker Compose to facilitate the deployment process.
That is pretty much it for the hardware communication that’s happening on the drone.
Too Long, Didn’t Read (TLDR): On the Drone, there will be 2 Computers. The Flight Computer running the Drone’s Autopilot and a Companion Computer handling processing and communications. They are connected using their respective serial ports.
Writing Software
I’m going to skip over the installation and setup instructions on our Flight and Companion Computers. Well, now that we have gotten the hardware side out of the way, we need to think about managing the communication between our Back-End and the Companion Computer. We know that the Flight Computer and Companion Computer are connected together physically, But.. How does a ground operator talk to the drone?
As mentioned earlier, our C3 Platform has a Back-End5 which will handle communications with the drone’s ROS 2 Nodes. Keep in mind that our ROS 2 application must subscribe and/or listen to topics published by PX4 in order to perform some actions. PX4 pre-defines specific topics in ROS 2 that the drone understands. These topics can be found here. Once the Companion Computer receives a message dictating a type of action, this action is forwarded to the Flight Controller. Similarly, real-time telemetry data is streamed from the drone to the back-end.
To ensure a reliable connection between our C3 Platform and the Drone, we considered many different communication methods, Apache Kafka, MQTT, WebSockets and more. After much consideration, we’ve narrowed it down to MQTT and WebSockets6, at least for development and proof-of-concept purposes.
MQTT vs WebSockets
I’ll refrain from going too in-depth into the exact details of both communication methods, just discussing their communication methodologies, advantages and disadvantages. Both MQTT and WebSockets only have to establish an initial handshake with the Target Device (e.g. the Drone) once, offering bandwidth savings.
MQTT
MQTT, or Message Queuing Telemetry Transport, is a Publish/Subscribe Protocol7 for Small Internet of Things (IoT) Devices that do not have a lot of computing and network connectivity.
It handles unstable networks especially well, requiring an acknowledgement that a message is received. This ensures that messages will always reach the target device (if an acknowledgement is not received, it resends the message), while ensuring that duplicate messages are not handled by the device. MQTT can be used for one-to-many communication, allowing a single client to talk to many target devices.
WebSockets
WebSockets are primarily built for real-time communication in web applications. It is very simple to use, but.. does not ensure that our message reaches the Target Device, and is usually for one-to-one communications.
The Conclusion: MQTT vs WebSockets
Hence, MQTT was elected to be used. The benefits of MQTT far outweighs the downsides of WebSockets. When communicating with a Drone, and potentially many Drones in a Drone Swarm, high reliability and low latency is of utmost importance. In addition, MQTT supports the use of Transport Layer Security (TLS) to ensure that all drone communications between the Back-End, MQTT Broker and every Drone’s Companion Computer is encrypted.
The setup of MQTT is simple, and is described below: MQTT Publisher (FastAPI Back-End) → MQTT Broker → MQTT Subscriber (Companion Companion)
A Little Hiccup.
Before development started, we decided to reflash PX4 onto the Flight Computer. However, after reflashing, QGroundControl was unable to establish a complete wired connection to the Flight Computer, repeatedly throwing the error – “QGroundControl was unable to retrieve the full set of parameters”. Despite reflashing the Flight Controller multiple times, we were unable to resolve this issue. Hence, a decision was made to switch the Flight Computer’s software to Ardupilot. For the rest of the article, Ardupilot would be referenced as the Flight Computer’s software.
Development wise, there are no obvious downsides to the use of Ardupilot over PX4. All architecture mentioned earlier still applies. The Companion Computer would still communicate to the Flight Computer over the uXRCE-DDS Middleware, whereas the only difference being the ROS 2 Interfaces are meant for ArduPilot instead of PX4.
Appendix
1A: Publisher and Subscriber Model
The Publisher and Subscriber (Pub/Sub) Model is used frequently in IoT Devices for communication. Notably in this article, Pub/Sub is used in ROS 2 and MQTT.
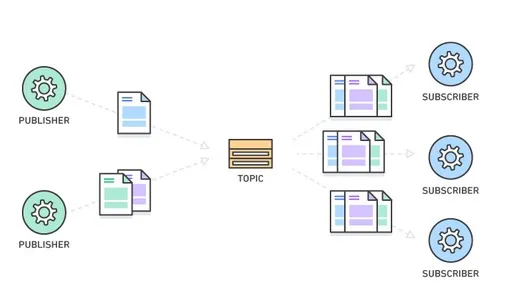
Diagram of a Publisher and Subscriber Model. Image Source: Amazon Web Services (AWS)
As seen from the Diagram, there are three main parts. The Publisher, Topic and Subscriber. In a Pub/Sub Model, device(s) can publish a message on a topic, or be subscribed to a particular topic to receive messages. If a Device (Device A) is subscribed to a topic which another Device (Device B) publishes to, when Device B publishes a message to a topic, Device A will receive it.
Think of YouTube, a Video Streaming Platform, which allows us users to ‘subscribe’ to many different channels. Channels can upload videos, and users will be notified when a new video is uploaded from a channel we subscribe to. That is essentially how a Pub/Sub Model works. The Channel is the Publisher, while we are the Subscribers.
References
- PX4 Hex Cube Black Flight Computer Reference
- Raspberry Pi 4 GPIO Pinout
- MavSDK Python Reference
- MavLink Developer Guide
- ROS 2 Humble Documentation
- ROS Client Library for Python (rclpy)
- PX4 Autopilot User Guide
- QGroundControl User Guide
- ArduPilot ROS 2 uXRCE_DDS Connection Guide
- eProsima Micro XRCE-DDS
- ROS 2 and DDS – ArduPilot Dev Conf 2023
- MQTT Standard
- The Differences between MQTT and WebSockets
Footnotes
-
https://docs.px4.io/main/en/flight_controller/pixhawk-2.html ↩
-
MavLink Official Documentation: mavlink.io ↩
-
MavSDK Official Documentation: mavsdk.mavlink.io ↩
-
A Serial Port is a physical connection interface (e.g. a pin on the device) to allow for data transfer ↩
-
Built on Python FastAPI. ↩
-
Apache Kafka was ruled out due to its complexity and potential cost implications. ↩
-
Sounds familiar? ROS 2 uses a Pub/Sub Model too. Refer to Appendix 1A for more information on what a Publisher/Subscriber Model is, and how it works. ↩